Monday, February 11, 2013

Owl Mitten

While going through the many many sites on quilting, i have come across some fascinating oven mitts and pot pinchers. i love the kitchen and spend hours in it. Making oven mitts with a twist has always been on my to do list. 

i decided to try my hand at making an 'owl' oven mitt. Since i had no tutorial, just a picture in mind, i used my regular oven mitt as a sample for the size. i cut out a basic template on paper of how my owl would look and used that as a guide to cut out the individual templates for the various body parts. 

i then proceeded with cutting the fabrics and the sponge for the batting. i used two layers of the sponge sheet just so that it would be more heat resistant. Even the fabric was double layered. Here are a few pictures of the WIP for the front of the mitt.


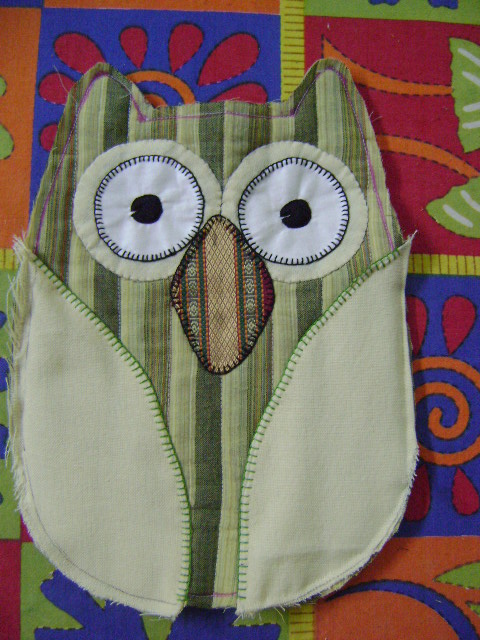
i simply machine stitched straight along the length to quilt. The eyes and the beak were appliquéd and then blanket stitched. The wings were machine stitched and then blanket stitched.

These are few pictures of the WIP of the back of the mitt


And...this is how the mitt finally looked...........


Things i would  do differently

  • i would make the thumb insertion pocket a little lower down. this mitt just covers the wrist. Personally i prefer mitts which go up at least 2 inches above the wrist (extra protection from burns) 
  • i would round off the mitt a little more in the lower part. i find it too broad.

i want to make more mitts, there are endless possibilities in terms of design and i think they'd make wonderful give aways. 

Sunday, January 27, 2013

My first work with hexagons - hand sewn

i've been doing a lot of online search for tutorials on patchwork and quilting. That's when i stumbled upon hexagons, and, it fascinated me!

when i went to my parents' place for my annual month long holiday  in May 2012, i decided to try my hand at it. i have always worked on some project while at mum's on a break. These have always involved hand sewing. The reason being, it gives me mobility, which means i can be with mamma, spend time talking to her and at the same time keep myself engaged in the process of creation. What better opportunity to try my hand at hexagons!

i first rummaged through mum's pieces of scrap. She has always tailored her clothes and mine till as long as i lived with them. I found lots and lots of scraps. Thus started my project. 

The first step was going back to basics of geometry. With a pair of compasses, i made a hexagon template on thick card paper. This was used to draw out around 25 odd hexagons on plain A4 paper, the regular one we use for printing purposes. Then came the step of cutting these hexagons out. i then proceeded to cut out squares from the fabrics that i had zeroed in on. i do not posses a cutting mat, rotary cutter or any other tools for that matter. So it was the good old way of using the scale and pencil, drawing lines and then cutting over them.

These are a list of some of the you tube tutorials i referred to while learning to work with hexagons.

http://www.youtube.com/watch?v=JseWMYdMtDs
http://www.youtube.com/watch?v=UcvpA3lqtkM
http://www.youtube.com/watch?v=FVkV8JBNaIQ
http://www.youtube.com/watch?v=Ide7Qqqra8E

While thread basting the cloth around the hexagon template, i did not stitch through the paper. This meant that there was no need of snipping the threads to pull out the paper. I managed to reuse the templates around three times, thereafter i just had to cut out more. 

My parents have an oval shaped table top. Thought i'd make it for that. i started to work on it the day after i arrived there which was the 19th of May and did all i could until the day i left which was the 17th of June. I wanted to stitch another strip of piping around the sides and also line it, but couldn't do so. Mamma has promised to complete it before i go back to visit them this year. 

This is the stage at which i stopped work on it.


The best thing about this apart from the fact that i can say, i've learnt to work with hexagons is that, it is completely made of scraps i found lying in the house. The fabric for the petals and the yellow around the flowers are remains of mamma's 'kurta' materials! The green and the the dark ochre are from her blouse pieces!!!

i loved working with hexagons! i now want to make a bed spread with them.


Saturday, January 26, 2013

Clocks with a difference

i have always admired hand made gifts, no matter what. They just have a special charm to them, something which makes it truly special.

it thus goes without saying that i try my best to make something as give aways for my friends. 

i worked on quite a few projects while leaving Bombay last year. Wanted to ensure that there was a personal touch to everything that i made for my many friends. 

Had this 'aha' moment when i decided to make some wall clocks for a group of my friends.


These are the five clocks standing in a line!!


 This one was for Connie and her husband Clevis. 


This one was for Rohit. That's the name of his blog which i painted. You must check out the blog, it's very very interesting! 


This one was for Priya and her very tall husband Sunil. They're from Tamil Nadu, tried to show some of that angle. 


 This one was for Mansi and her husband Alan. Tried to portray some Gujju angle!


This one was for the Bengali beauty Sriparna and her husband Bir.

All of them had come home in the evening. Mansi was the one who arranged all the clocks in a line. She asked each one of them to pick their own clocks. Much to my delight they picked up what was meant for them!

For Amrita didi

Amrita didi is a very dear friend of mine, even though we are 20 years apart in our ages (that's why the didi). i have shared some wonderful times with her. We've discussed parenting, children, food, recipes, current affairs and just about anything under the sun. We've shared many many laughs and a few tears also. 

Something i always tell Amrita didi is that it's been a privilege knowing her. 

Since i was leaving Bombay lock, stock and barrel early last year, i decided to make a comforter for Amrita didi. She loves flowers, loves gardening and so, i decided to do something in floral prints. I decided to do something in patchwork. For all the love and affection she's shown me, i chose to go with hearts. This was going to be my second big patchwork project.  The first one was with pin wheels which i hope to find a picture of and share.

I was busy packing up my house and so had only the nights to work on this comforter. It was exhausting, but i enjoyed every minute of it. 


  • i alternated the fabric for the hearts so that it would not be too monotonous and also to balance out the dark green. 
  • i used the pink strips so as to create an impression of a centre panel
  • The material i sourced was something called 'lizzie-bizzie' here in India.

i do not remember the exact dimensions of the comforter, but i do know that it covered the double-sized bed in the room we had moved into while packing home. 

With packing and farewell meals happening side by side, i took about two weeks to complete this. i handed it over to Amrita didi the night before we were leaving Bombay!

(and yes, my sewing machine was the last item to be packed!)

For Siya

Siya is a bubbly 4 year old girl. i met her around 3 years back and we hit it off immediately! i love children and she loves bangles!! It has been a treat to watch Siya grow into little girl from the baby i had first met her as. 

Siya's dad was transferred to another city. This was December 2012. I hadn't known their departure date. And, finally when i did get to know of it, i had two days!! Somehow, all my projects have been last minute!! Luckily have managed to complete them all and they have come out fairly okay. 

So the race against time began........ once again.................

Decided on making a bed spread for her. It would be colourful bugs and a couple of flowers. I sized them fairly large thus enabling quick appliquéing. 


It had four bugs in all, two on either ends. There were two flowers, again one on either end. 


For the bugs i alternated the fabric between the wings and the body. That way, every bug was different, yet, there was something common which held it all together. i so wanted to blanket stitch round the wings just to give it more texture, but sadly, ran short of time ( had to happen).


i had this colourful shirting material lying with me, so i used it to surround the centre panel. There was no batting needed as it was a bed spread. Used white cotton for the lining. 

Though most of my projects have been last minute, i doubt if i was so much on the edge for any as i was for this. i managed to finish the spread by half past eight at night!

By the time my husband and i rushed to Siya's house, she was fast asleep :( . I couldn't see her reaction. However, her mum called the next day and told me that when she woke up in the middle of the night, she was shown her gift and she insisted that she wanted to sleep on it! Very sweet of the parents to show it to her at that hour!!!

Friday, January 25, 2013

For Vedika

Prakash and Kanika are dear friends. They were blessed with a very cute baby girl in early 2011. Soon after, they invited us over for a sumptuous Holi brunch! It truly was a treat - paapdi chaat, poori - aalu and moong daal halwa to die for! Kanika is a phenomenal cook! 

I had one day to make something if i wanted to. i decided on a small quilt, something that they could use in the baby carriage in their car. 


Time was a constraint, so i couldn't go scouting for material. i managed to pull out something from all the material and scraps i have collected over the years. i was lucky i managed to find polka dotted fabric in the same colour combination but in different sizes of dots.

Since it was predominantly red, i selected this blue striped material for the top layer. Again, since it was red and also a new born baby what better shape than hearts. Along with hearts i decided to have stars as well. 

I used chalk to mark out the diagonal lines which would serve as blocks for the hearts and the stars. i decided to stitch on red satin ribbon. When i tried the sewing machine, i realized that it was pulling at the threads of the ribbon. i then hand stitched the ribbon as also the shapes. The only part where i used the sewing machine was when i layered the top fabric, the batting and the lining. While doing so, i also attached the border piping. 

For the batting i had used some casement fabric and for the lining, soft white pure cotton cloth.

All in all, it looked very bright and happy!

When Kanika and Prakash saw it, they were thrilled and stated that it was ideal for the car! Glad, it was used for the purpose it was intended for!

Thursday, January 24, 2013

For Inika

Priya is a good friend. We met while working in the same organization while i was stationed at Bombay. In mid 2011, Priya was blessed with a baby girl. They named her Inika meaning 'little earth' What a beautiful name!

Once Priya got back to work post her maternity break, is when i decided to make a baby quilt for Inika. This was late 2011. i had two themes in mind - butterflies and ladybirds. The new mamma chose butterflies, so butterflies it was.


  • for the top of the quilt, i used striped shirting material - again for the texture and the shine. I somehow seem to have an affinity for striped! Probably it adds to the fullness feel when you look at the piece. 
  • the size was not too big - two and a half feet in width and five feet in length.
  • the batting was poly fill sheets
  • the backing was soft off white cotton
  • the colours were based on the shirting material i had sourced, which was peach.
  • for the design, i decided to place the butterflies in such a manner that the quilt could be used either ways length wise. This was something which i had realized after making Michelle's quilt. That was only one -sided length wise. 
  • the bodies of the butterflies were all in light blue which lent a certain uniformity to the six creatures on the quilt.
  • an idea which struck me (and which i loved) was to also include Priya's daughter's name!
  • i used broad running stitches which gave a stringing effect to the name which was appliqued on either sides  and also gave the feel of everything coming together.

This is a close up of one end of the quilt. i appliqued three butterflies on either ends and also a few flowers. The name 'Inika' was also appliqued on either ends. The butterflies had smiling faces with eyes which were stuck on to them.

What i loved about this piece was the baby's name. It just made it feel so personal, made exclusively for her. One thing i would have done differently was to keep the piping the same all around. Now, when i look at the picture i really don't know why i chose that dull peach for piping along the breadth of the quilt. Also, i now think i should have made it a little bigger. Wonder what i was thinking!

Priya liked the quilt and i believe Inika was thrilled to see the number of butterflies! Apparently she kept going from one butterfly to the other!